Scenario - Storage Classes and Storage Profiles
In this scenario, we will install Portworx Enterprise on an existing OpenShift cluster and create a new default StorageClass for virtual machines.
Creating our project
For this lab, we will be using a new project. In the terminal window execute the following command to create a new project.
oc new-project vmtestReminder: Accessing the OpenShift Console
You can connect to the terminal in the windows to the right.
| The {openshift_cluster_console_url}[OpenShift Web Console^] tab will open in a new browser window. |
The username is {openshift_cluster_admin_username} and the password is {openshift_cluster_admin_password}
Install Portworx
To install Portworx, we first need to install the Portworx Operator.
Task: Enable User Workload Monitoring
Newer OpenShift versions do not support the Portworx Prometheus deployment. As a result, you must enable monitoring for user-defined projects before installing the Portworx Operator. Use the instructions in this section to configure the OpenShift Prometheus deployment to monitor Portworx metrics.
To integrate OpenShift’s monitoring and alerting system with Portworx, create a cluster-monitoring-config ConfigMap in the openshift-monitoring namespace:
cat << EOF | oc apply -f -
apiVersion: v1
kind: ConfigMap
metadata:
  name: cluster-monitoring-config
  namespace: openshift-monitoring
data:
  config.yaml: |
    enableUserWorkload: true
EOF
Task: Install the Portworx Operator
Navigate to Operators > Operator Hub and type Portworx in to the filter, as seen in this screenshot:
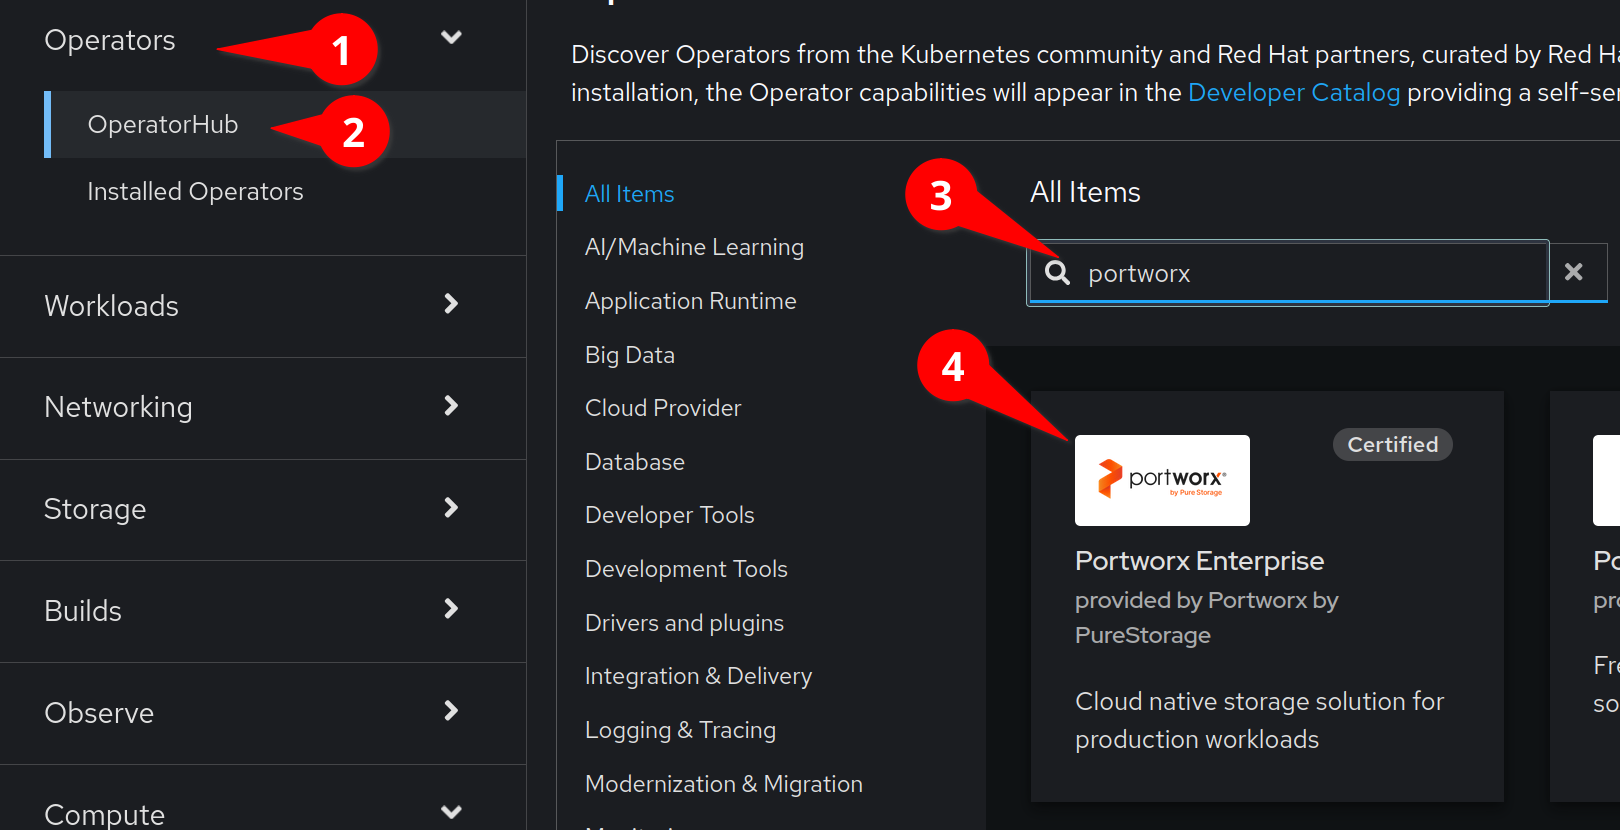
and then click on the Portworx Enterprise operator.
We will now see the installation screen on the right of our interface.
The defaults will suffice, and will grab the latest stable version of
the operator. Click Install

On the next screen, enable the Console plugin
Create the a new project named portworx and install the Portworx
operator in to the new portworx project.
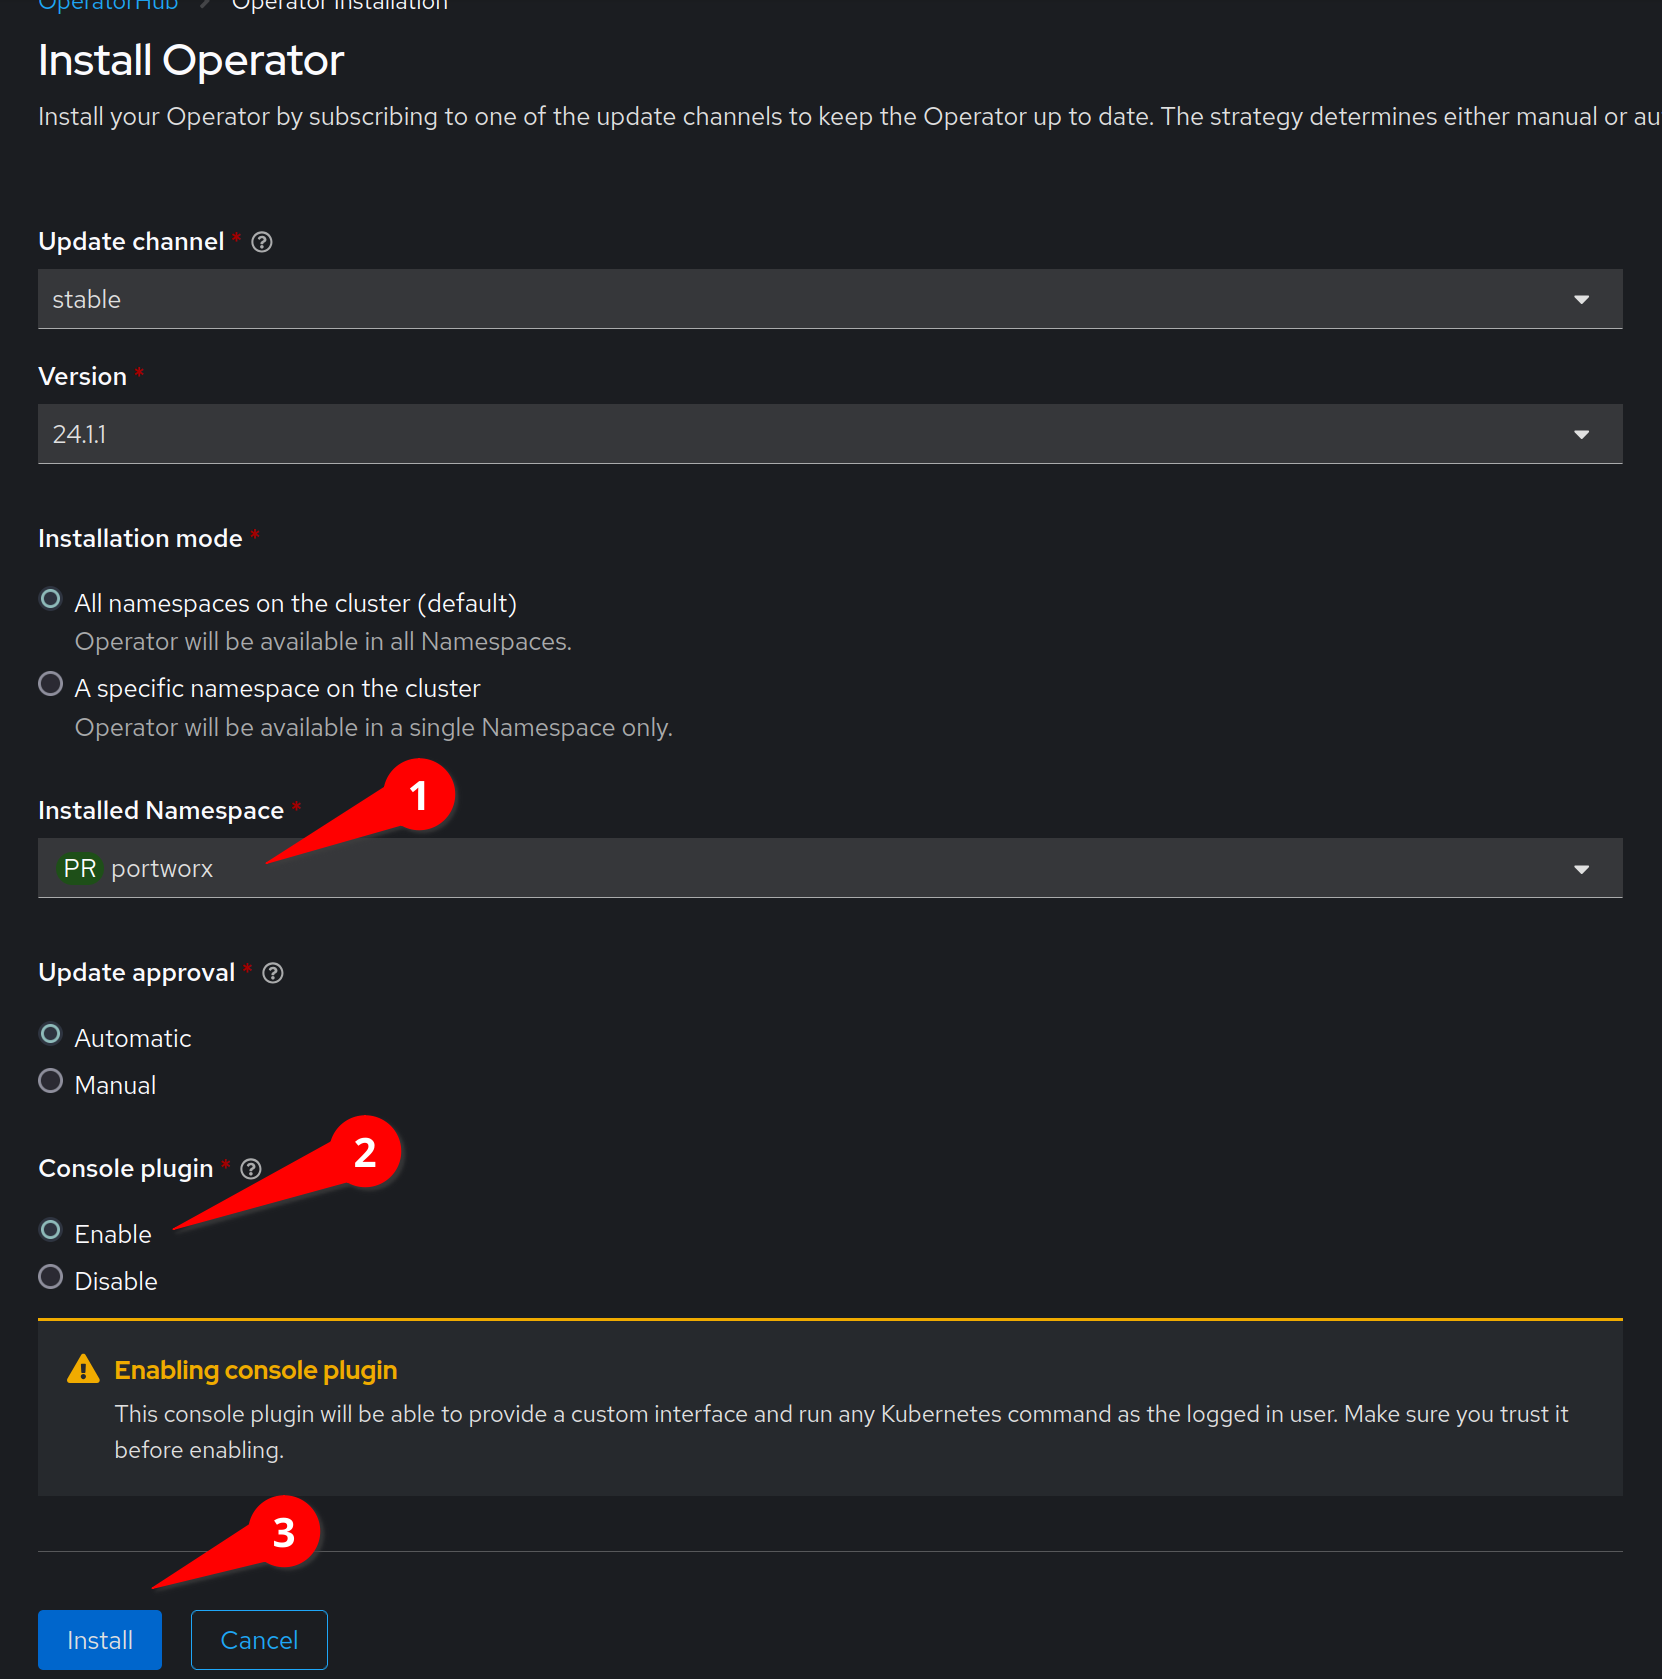
and click the Install button.
The installation will prompt you to create a StorageCluster object,
instead, click View installed Operators in Namespace portworx
Task: Install Portworx StorageCluster
For this step, we need to switch back to our Terminal.
Grab our StorageCluster specification:
curl -o $HOME/px-spec.yaml 'https://install.portworx.com/3.1.6?operator=true&mc=false&kbver=1.29.10&ns=portworx&b=true&iop=6&s=%22type%3Dgp3%2Csize%3D50%22%2C%22&ce=aws&r=17001&c=px-cluster-443e64d8-f2c7-47d2-b81b-295567465a84&osft=true&stork=true&csi=true&tel=false&st=k8s&mz=3'Take a look at our current manifest by using the cat utility:
cat -n $HOME/px-spec.yaml-
Line 9 tells Portworx that we are installing on an Openshift cluster
-
Line 11 contains the Portworx image we are using. Upgrading Portworx is as easy as changing this line.
-
Lines 15-17 contain our disk configuration. These disks will be created and attached as part of the Portworx installation.
-
The rest of the file contains various features that we want to enable in Portworx
Additional documentation can be found here
We can now apply the specification:
oc apply -f $HOME/px-spec.yaml| The Portworx cluster pods can take up to 10 minutes to start. During this time, you will see pods restart. This is expected behavior. |
We can watch the containers come up by running:
watch oc -n portworx get podsWhen all three of the px-cluster pods have a Ready status of 1/1 we
can press ctrl-c to exit out of our watch command.
Task: Check the Portworx cluster status
Portworx ships with a pxctl CLI utility that you can use for managing
Portworx. We’ll cover this utility more in the labs here in a little
bit!
For now, we’ll run sudo pxctl status via oc in one of the Portworx
pods to check the StorageCluster status.
First, setup the PX_POD environment variable:
PX_POD=$(oc get pods -l name=portworx -n portworx -o jsonpath='{.items[0].metadata.name}')Next, use oc to execute sudo pxctl status within a pod defined by
the PX_POD environment variable to check the Portworx StorageCluster
status:
oc exec -it $PX_POD -n portworx -- /opt/pwx/bin/pxctl status --colorWe now have a 3-node Portworx cluster up and running!
Let’s dive into our cluster status: - All 3 nodes are online and use Kubernetes node names as the Portworx node IDs.
-
Portworx detected the block device media type as
STORAGE_MEDIUM_NVME, and created a storage pool for those disks. If you have different types of disks, for example SSD and magnetic/rotational disk, a dedicated storage pool would be created for each type of device.
To make things easier throughout the lab, let’s set a bash alias for pxctl:
echo "alias pxctl='PX_POD=\$(oc get pods -l name=portworx -n portworx --field-selector=status.phase==Running | grep \"1/1\" | awk \"NR==1{print \$1}\") && oc exec \$PX_POD -n portworx -- /opt/pwx/bin/pxctl'" >> ~/.bashrc

source ~/.bashrc
Now test out the alias:
pxctl status --colorStorage Classes and Storage Profiles in Openshift
Storage Classes are a Kubernetes concept that allows an administrator to describe classes of storage they offer. Storage Classes are unopinionated about what the class represents, but it may include things such as: quality-of-service levels, backup policies, or snapshot policies.
Portworx storage classes offer a number of configuration parameters that can be used to configure the amount of replicas, or encryption-at-rest configurations.
Storage Classes are not specific to Openshift or Virtualization, but we still need a storage class to provision virtual machine disks.
Task: View existing storage classes
Portworx deploys several pre-configured storage classes when the storage cluster was created. These storage classes offer a variety of configuration options. To view the current storage classes run:
oc get scPortworx offers Kubernetes in-tree and CSI provisioners. Storage Classes
that contain the -csi- string.
Let’s look at the configuration of an example storage class:
oc get sc px-csi-db -o yamlWe can see in the terminal output a list of parameters. This isn’t exactly what we want for our new virtual machines, so let’s create a new storage class.
Task: Create a new storage class for VMs
First, let’s set the gp3-csi StorageClass to no longer be the default:
oc patch storageclass gp3-csi \
  -p '{"metadata": {"annotations":{"storageclass.kubernetes.io/is-default-class":"false"}}}'
Run the following command to create a new yaml file for the block-based StorageClass configuration:
cat << EOF |oc apply -f -
---
apiVersion: storage.k8s.io/v1
kind: StorageClass
metadata:
  name: px-csi-vm
  annotations:
    storageclass.kubernetes.io/is-default-class: "true"
parameters:
  repl: "3"
  sharedv4: "true"
  sharedv4_svc_type: "ClusterIP"
  sharedv4_mount_options: vers=3.0,nolock
provisioner: pxd.portworx.com
reclaimPolicy: Delete
volumeBindingMode: WaitForFirstConsumer
allowVolumeExpansion: true
EOF
PVCs provisioned using the above StorageClass will have a replication factor of 3, which means there will be three replicas of the PVC spread across the OpenShift worker nodes.
We have also set some configuration options on how RWX volumes should
work. We specified the service type to ClusterIP which uses a cluster
IP as the endpoint of NFS, and set some mount options.
We also specified that the volumeBindingMode should be
WaitForFirstConsumer to allow Portworx to intelligently place the
volume.
See the Portworx Documentation for further details.
Also note that the provisioner is set to pxd.portworx.com. This
means that our storage class will be using CSI rather than the in-tree
provisioner.
With our StorageClass created, we can now create move on to Storage Profiles.
Install and Configure Openshift Virtualization
Task: Install the HyperConverged CR
The OpenShift Virtualization operator has already been installed for our environment. Now that the Portworx StorageCluster has been deployed and we have created the default storage class we can create the HyperConverged object that actually deploys OpenShift Virtualization to our cluster.
We can install the HyperConverged CR using the following command:
cat << EOF | oc apply -f -
---
apiVersion: hco.kubevirt.io/v1beta1
kind: HyperConverged
metadata:
  name: kubevirt-hyperconverged
  namespace: openshift-cnv
spec:
  filesystemOverhead:
    global: "0.08"
EOF
The installation can take a few moments. Verify that the HyperConverged object is running by monitoring the
pods in the openshift-cnv project until all pods show in Running state and no new pods appear:
watch oc -n openshift-cnv get pods| It is also possible to install the Operator and HyperConverged object using the Openshift UI. We have opted to use the CLI to make the process more repeatable |
Patch the StorageProfile to default to RWX filesystem
A recent change to the Containerized Data Importer (CDI) can cause issues when provisioning virtual machines with Portworx storage.
Specifically, the default StorageProfile associated with the Portworx StorageClass may not support the necessary access modes.
The script locates all StorageClasses provisioned by Portworx, then updates their corresponding StorageProfiles to:
-
Set RWX + Filesystem as the preferred access mode
-
Include support for RWO with both Filesystem and Block volume modes
-
Use
csi-cloneas the default cloning strategy for improved compatibility with DataVolumes -
Clean up existing PVCs, DataVolumes, and import cron jobs to avoid conflicts after the patch
Paste in the script to create the file patch_storageprofiles.sh
cat <<EOF > patch_storageprofiles.sh
#!/bin/bash

set -euo pipefail

NAMESPACE="openshift-virtualization-os-images"
PROVISIONER="pxd.portworx.com"

echo "Finding StorageClasses with provisioner '\${PROVISIONER}'..."

STORAGE_CLASSES=\$(kubectl get storageclass -o json | jq -r \
  --arg prov "\${PROVISIONER}" \
  '.items[] | select(.provisioner == \$prov) | .metadata.name')

if [[ -z "\${STORAGE_CLASSES}" ]]; then
  echo "No matching StorageClasses found with provisioner \${PROVISIONER}"
  exit 0
fi

# Save desired StorageProfile spec JSON to a temporary file
SPEC_FILE=\$(mktemp)
cat > "\${SPEC_FILE}" <<EOF_SPEC
{
  "claimPropertySets": [
    {
      "accessModes": ["ReadWriteMany"],
      "volumeMode": "Filesystem"
    },
    {
      "accessModes": ["ReadWriteOnce"],
      "volumeMode": "Block"
    },
    {
      "accessModes": ["ReadWriteOnce"],
      "volumeMode": "Filesystem"
    }
  ],
  "cloneStrategy": "csi-clone",
  "dataImportCronSourceFormat": "pvc"
}
EOF_SPEC

echo "Updating corresponding StorageProfiles..."

for sc in \${STORAGE_CLASSES}; do
  echo "Patching StorageProfile: \${sc}"
  PATCH_FILE=\$(mktemp)

  jq -n --slurpfile spec "\${SPEC_FILE}" \
    '[{"op": "replace", "path": "/spec", "value": \$spec[0]}]' > "\${PATCH_FILE}"

  if kubectl patch storageprofile "\${sc}" --type='json' -p "\$(cat "\${PATCH_FILE}")"; then
    echo "Patched \${sc} successfully"
  else
    echo "Failed to patch \${sc} — continuing..."
  fi

  rm -f "\${PATCH_FILE}"
done

rm -f "\${SPEC_FILE}"

echo "Cleaning up PVCs, DVs, and DataImportCrons in namespace: \${NAMESPACE}"

kubectl delete pvc --all -n "\${NAMESPACE}" --ignore-not-found=true
kubectl delete dv --all -n "\${NAMESPACE}" --ignore-not-found=true
kubectl delete dataimportcron --all -n "\${NAMESPACE}" --ignore-not-found=true

echo "Done!"
EOF
Next, make the script executable and run the script.
chmod +x patch_storageprofiles.sh && ./patch_storageprofiles.shLet’s check the PVCs for the vm images. You should see the status as Bound and the Access MOde as RWX
oc get pvc -n openshift-virtualization-os-imagesNAME STATUS VOLUME CAPACITY ACCESS MODES STORAGECLASS VOLUMEATTRIBUTESCLASS AGE
centos-stream9-e065d9079064 Bound pvc-cbfe2447-6a3d-4eea-ada5-143a33960d2b 33Gi RWX px-csi-vm <unset> 5m52s
fedora-4fcda30051d5 Bound pvc-4d1efdcc-fec3-47e5-9f98-4ad233ae0f51 33Gi RWX px-csi-vm <unset> 5m52s
rhel10-beta-da1c0cdc24da Bound pvc-f484971c-10ce-4036-82a5-cb2c656c43e6 33Gi RWX px-csi-vm <unset> 5m51s
rhel8-833d0f124287 Bound pvc-a36b7e73-6f67-43a7-b0b7-bff135f4ce0f 33Gi RWX px-csi-vm <unset> 5m51s
rhel9-0c9204ba64c2 Bound pvc-0879b51d-708c-4b37-9483-ae667e047954 33Gi RWX px-csi-vm <unset> 5m51sTask: Install Virtctl
Many functions we will use rely on a utility called virtctl. Virtctl allows us to interface with our virtual
machine through the control plane of Openshift. This means that we will not have to configure Openshift Networking
to interact with our virtual machines. OpenShift Virtualization makes the matching version of virtctl tool available for download from our cluster.
wget $(oc get consoleclidownload virtctl-clidownloads-kubevirt-hyperconverged  -o json | jq -r '.spec.links[] | select(.text == "Download virtctl for Linux for x86_64") | .href')

tar -xvf virtctl.tar.gz
chmod +x virtctl
sudo mv virtctl /usr/local/bin
Task: View the Storage Profile
Storage Profiles provide recommended storage settings based on an associated storage class. Storage profiles are automatically created in Openshift when a new storage class is created.
Portworx sets desired parameters when using the CSI provider, including the preferred access mode.
We can see the current configuration of our new storage profile by running:
oc get storageprofile px-csi-vm -o yamlWe can see under the .status node a list of access modes. The first
access mode: RWX in filesystem mode will be preferred.
For further details on storage clusters, see the Openshift documentation.
With Portworx and OpenShift Virtualization installed and configured, we are now ready to move on to the next lab.